Add Your Company Logo to Ignite ERP
Introduction
In this guide, we'll walk you through the process of adding or updating your company’s logo to Ignite ERP. This includes adding your main company logo plus any others used for specific purposes, such as the logo used on company cheques, direct deposit forms, etc. Not only does this add professionalism to your company’s invoices and other documents, it can also help your staff differentiate between company’s when working in a multi-company organisation.
Adding or Replacing a Logo
Step 1: Navigate to the Logos and Images Section
- Go to Finance > Maintenance > Logos and Images.
- Here, you will see all the logos and images stored for your company.
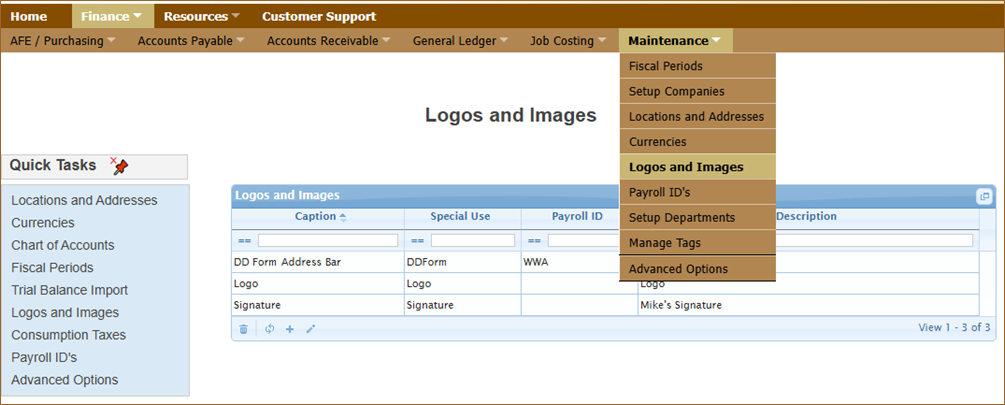
Step 2: Creating or Editing a Logo
- To add a new logo click on the New + button below the list of logos.
- To edit or replace an existing logo select the logo from the list and then click the Edit (pencil) button.
- Fill in or edit the required information about the logo.
- Caption – Captions are displayed when users hover over an image and in some cases may present above or below an image on screen or in reports.
- Special Use – This is an identifier for selecting which logo you want in forms and reports. Some special reserved names are listed below:
- Logo – Default displayed on screen and company reports.
- DDForm – Default for payroll direct deposit forms.
- Payroll – If your company has multiple payroll ID’s this specifies which payroll ID the logo applies to. For example, direct deposit forms for different payroll accounts can display a different logo.
- Description – a customized description that describes the logo or explains where it is intended to be used.
Step 3: Select or Upload an Image for your Logo
- Click on the logo or the area where the logo would be located as shown below to open the image library.
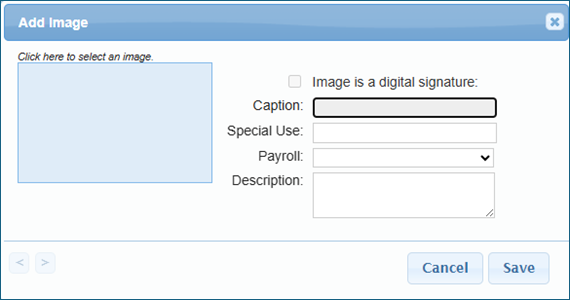
- Choose an image from the library or click the Upload New button. After uploading a new image make sure to find it in the image library and select it when done.
- Click OK to finalize your selection and close the Image Library.
Step 4: Save and Refresh
- After selecting an image for your logo, click Save.
- If you’ve changed your default logo the new logo will be displayed once you refresh the browser page or navigate to a new one.
Conclusion
By following these steps, you can easily add your company's logo to Ignite ERP to better reflect your branding.
If you have any questions, feel free to post a reply to this article, consult any of our other Support Centre resources, or use the Contact Us button at the bottom Support Centre page.